• HOME
  • ABOUT
    • PRIVACY
    • DISCLOSURE
    • TERMS & CONDITIONS
  • Get in Touch

Always Made With Love

  • DIY / Crafts
    • DIY
    • CRAFTS
    • CELEBRATE
      • EASTER
      • CHRISTMAS
      • PARTIES
  • Lifestyle
    • ACQUISITIONS
  • Motherhood
  • Kids
    • BABY
    • TODDLERS
    • KIDS CRAFTS / ACTIVITIES
  • Food

How To Make An Anti Gravity Cake

November 22, 2016 by lydiaritchie 18 Comments

how to make an anti gravity cake

A couple of weeks ago my hubby Steve celebrated his birthday. It wasn’t just any birthday it was the big 4-0! And like any good birthday celebrations, there was cake. Not just any cake either, Red Velvet Cake (his favourite).

I had been toying with the idea of making an ‘Anti Gravity Cake’ for a while now, but as you can see.. it is not exactly the type of cake you just whip up and serve for afternoon tea. So thanks to Steve, I now had the perfect excuse occasion for which to make this creation.  

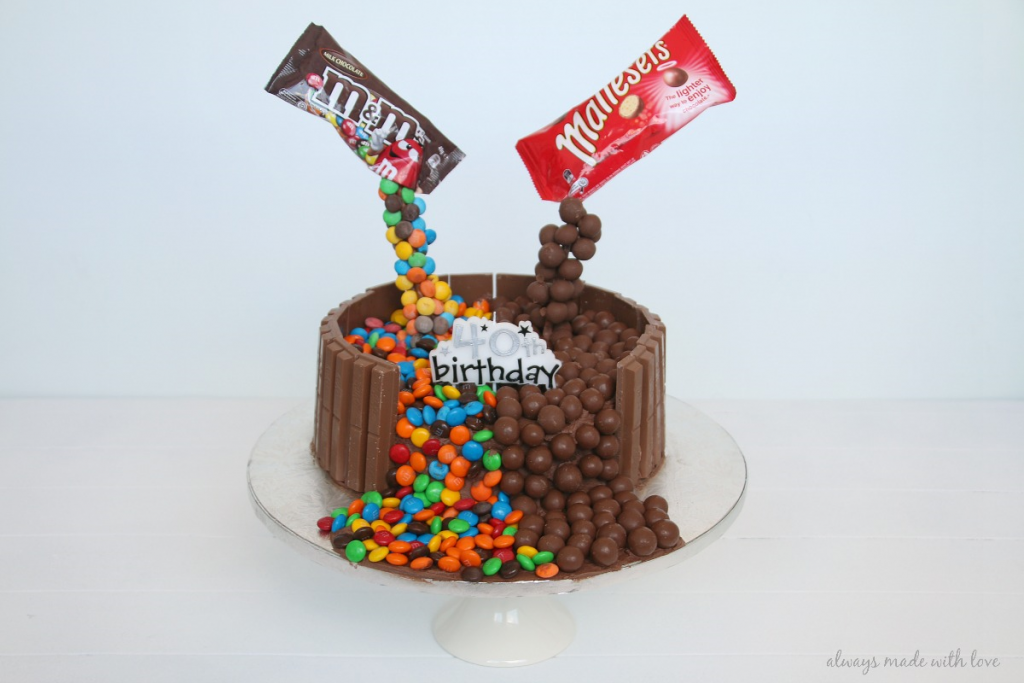
For those of you who are wondering what on earth I am going on about, an Anti Gravity Cake is basically a cake that looks like it’s defying gravity in some way. If you check out my Pinterest board you will see that my favourite versions of this cake are of course (!) the ones covered in lollies. And, they were just perfect for my sweet tooth, loving husband.

how to make an anti gravity cake With the perfect reason to give this cake a go, I banished Steve to the home office the night before his birthday; armed myself with my vision, crossed all my fingers and toes and got to work to (hopefully) create this cake and end up with something like the pictures I had been pinning madly. I was pleasantly surprised with how it turned out and was even more surprised with how easy it was to do.

So, it seems only fair given the fact I have shown you a sneaky peek of said cake, that I let you in on the secret of how you can create one of these for yourself (as I said before, it’s really quite easy!). Apologies in advance for the lack of photos, as it was night when I but this bad boy together I could only take photos the day after of the completed product.

how to make an anti gravity cake To create your own Anti Gravity Cake you will need:

  • Your cake of choice, I used a double mix Red Velvet Cake as I wanted height
  • A double batch of butter cream icing
  • 2 wooden cake dowels, length depends on how high you want defy gravity
  • Chocolate for melting, you can use cooking, chocolate or whatever you have on hand
  • Kit Kats (3 king sized blocks fits perfectly, no sneaky fingers… If you want to just put lollies on the top of the cake , not down the side, you will need 4 blocks)
  • Lollies of choice, I used M & M’s and Malteasers  
  • Cotton Balls
  • Cake board, plate or stand
First off, melt your chocolate., I like to use bursts of 30 – 45 seconds in the microwave stirring between each burst until just melted. Coat each of your wooden cake dowels in the melted chocolate then roll in your choice of lollies. I found it was easiest to pour the melted chocolate into a oven tray and roll the cake dowels in it before rolling them in the lollies. Once completely covered, place in the freezer to set. Once set you will notice where there are any holes are you can go back and patch them up, so don’t throw away any unused chocolate 🙂
 
Take your cake and slice through the middle. Place one half on your cake board, I placed it slightly to the back of my cake board to allow for the effect of the spilling lollies. Spread the cake with your choice of butter cream icing, I used chocolate. Top with the second cake.
 
Apply a thin coat of butter cream icing to the top and sides of your cake to seal all the crumbs. Refrigerate for 10 minutes to set. During this time, break the Kit Kats bars into pieces,  so you have two Kit Kat fingers together (I found it easiest to break them into pieces, as they split when I tried cutting them). Cover your cake with three quarters of the remaining icing. Use the remaining icing to cover the cake board right out to the edges (this will give the effect of the lollies spilling down the side of the cake and on to the board).
 
Stick the broken Kit Kat fingers around the side of the cake, leaving approximately a quarter uncovered. Fill in the middle, sides and cake board with your chosen lollies.
 
Empty a smaller packet of your chosen lollies (as you can see I used Malteasers and M & M’s). Fill with cotton balls to give the illusion of being full without the weight. Insert one end of your now set lolly covered dowels into the empty packet, seal with a bit of tape. Repeat, this with both types of lollies. Insert the other end into your cake at an angle (I poked a hole in the cake first to make it a bit easier).
 
Voila ~ you have now created an ‘Anti Gravity Cake’. Sit back and relax (pour a glass of wine), job well done!how to make an anti gravity cake
 
What do you reckon.. is this something you would attempt?
signature
  • Twitter
  • Facebook
  • Google
  • Pinterest
  • More
  • Reddit
  • Email
  • Print

Related

«
»

Filed Under: DIY / Crafts, Food Tagged With: Birthday, Birthday Cake, Create, Creative, DIY & Crafts, How to, Tutorial

Comments

  1. Kylie Purtell - A Study in Contradictions says

    September 15, 2015 at 4:28 pm

    That looks so awesome! I always wondered how it was done and now I know! Definitely one to pin for later.
    #teamIBOT

    Reply
    • lydiaritchie says

      September 15, 2015 at 8:21 pm

      Thanks Kylie! I was always intrigued by this cake, and am so glad I finally gave it ago xx

      Reply
  2. Lauren @ Create Bake Make says

    September 15, 2015 at 5:15 pm

    This looks fantastic – you are too clever 🙂

    Reply
    • lydiaritchie says

      September 15, 2015 at 8:19 pm

      Aw, thank you. It was lots of fun xx

      Reply
  3. Hannah says

    September 15, 2015 at 7:20 pm

    Wow this looks amazing!!! I have always been too frightened to try making one these cakes but maybe I’ll have to give it a go!

    Reply
    • lydiaritchie says

      September 15, 2015 at 8:17 pm

      I felt the same way to begin with, but I ended up having so much fun putting it together and was so surprised how easy it was. Would love to hear how you get on with it xx

      Reply
  4. Marleen says

    September 15, 2015 at 9:23 pm

    This cake looks amazing! You did such a good job. I don’t know if i would have the patience to do this, but it is something i would love to try!

    Reply
    • lydiaritchie says

      September 17, 2015 at 2:06 pm

      Thanks Marleen, I had so much fun putting it together. I’m sure you could do it xx

      Reply
  5. Becky from BeckyandJames says

    September 15, 2015 at 10:58 pm

    Wow! That’s awesome, thanks for sharing. My hubby is having a birthday next week and I’d love to try something like this but I don’t really have much skill!

    Reply
    • lydiaritchie says

      September 17, 2015 at 2:07 pm

      You are in luck! Not much skill is required, but it looks SO impressive! Give it a go, you will be glad you did Becky xx

      Reply
  6. Fairlie says

    September 18, 2015 at 1:58 pm

    Very effective! What a fun cake. I’m sure it made quite an impression. (Came via #FYBF)

    Reply
    • lydiaritchie says

      September 18, 2015 at 2:35 pm

      Thanks! Definitely the kind of cake that makes an impression, best part was, its so easy to do. xx

      Reply
  7. Kirsty @ Smarter Happier says

    September 18, 2015 at 6:31 pm

    That cake rocks! No sure I would attempt it (even though is seems relatively easy, but I’m not culinary at all!) but what a statement for your husband’s 40th!

    Reply
    • lydiaritchie says

      September 20, 2015 at 2:40 pm

      Thanks Kirsty. I’m sure you could give it a go, you’ll be surprises how easy it really is xx

      Reply
  8. EssentiallyJess says

    September 20, 2015 at 10:04 pm

    I would love to do this one time. Thanks so much for the tips. You’ve done a great job 🙂

    Reply
    • lydiaritchie says

      September 22, 2015 at 12:46 pm

      Thanks Jess, all the best for yours, when you give it a go xx

      Reply
  9. Kaz @ Melting Moments says

    September 20, 2015 at 10:40 pm

    This is a super cool cake. I have seen similar and wondered how it was done. I am almost game enough to give it a go now 🙂

    Reply
    • lydiaritchie says

      September 22, 2015 at 12:46 pm

      Thanks Kaz!
      It was really quiet easy to do once I figured out how I was going to go about it.
      Funny thing is, I wasn’t going to post about it but it has been really quite popular, I’m glad I did now. xx

      Reply

Leave a Reply to Fairlie Cancel reply

Your email address will not be published. Required fields are marked *

Welcome! I'm Lydia, the face behind Always Made With Love; wifey to Steve and stay at home mummy to Sebastian and Isabelle. I blog about motherhood, my family, our life, food I love, as well as crafts and the odd DIY. Join me and stay a while xx
  • Email

LATEST ON INSTAGRAM

Saturday, February 3rd, 2018 at 7:28pm
  • 45
  • 1
Saturday, February 3rd, 2018 at 5:15pm
  • 48
  • 4
Saturday, February 3rd, 2018 at 11:59am
  • 44
  • 1
Friday, February 2nd, 2018 at 7:55pm
  • 49
  • 3

Sponsors

Isabella Bows

Archives

  • ► 2017
    • ► December
      • From the Munch Cupboard ~ Munch Eco Straws
    • ► October
      • Introducing: Optically.co.nz
    • ► September
      • Toddler Tuesday's at NorthWest
    • ► August
      • Shop Small, Support Local featuring Fox & Child
      • Mid Winter Mexican
    • ► July
      • Shop Small, Support Local featuring Children of the Trees
      • Shop Small, Support Local featuring KP Designs
    • ► June
      • Shop Small, Support Local featuring Owl & Monkey
      • Chux - Helping this Mum clean since 2013
      • Shop Small, Support Local featuring Mud Mates
    • ► May
      • Shop Small, Support Local featuring Only Love
    • ► April
      • Shop Small, Support Local featuring Isabella Bows
      • Relax! I'm Cosy. {Review & Giveaway}
      • Yoghurt Pops
    • ► March
      • Shop Small, Support Local featuring Dream Ruby Boutique
      • Shop Small, Support Local featuring Daisydot
      • Letter to My Little Miss
      • Shop Small, Support Local featuring Silverstone Jewellery
      • Ditching Plastic with Honeywrap
    • ► February
      • SoSimple Skincare Review
      • Summer at the Beach With Kids
    • ► January
      • Summer Berry Semifreddo
      • New Year! New Direction?
  • ► 2016
    • ► December
      • Chocolate Brownie in a Jar with FREE Printable
      • Gingerbread Reindeer Cookies
      • A Giveaway & A Coffee Machine
    • ► November
      • How To Make An Anti Gravity Cake
      • 'Boody' Organic Bamboo Eco Wear || Anything BUT Basic
      • Banana Chocolate Chip Muffins
    • ► October
      • Revitalash Eyelash Conditioner
      • Preparing for Preschool
      • From the Munch Cupboard ~ Munch Lunchbox
      • Who's on Pole? ~ Book Review
      • Preschool
      • Relax with Float Culture
    • ► September
      • Double Chocolate Ice Cream Sandwiches
      • 3 Years With My Little Man
      • Create a Treasure Chest
      • Tot's Pantry ~ Nutritious Meals for Little Tummies
      • Isabelle's Girly Nursery Reveal
      • From the Munch Cupboard ~ Munch Baby Feeder
    • ► August
      • Sachie's Kitchen Meal Kits
      • Honesty. Honestly.
      • I'm Breaking Up With SNAPCHAT
      • Cheese Puffs
      • Go Fish! DIY Fishing Game
      • Having Fun Outdoors this Winter
    • ► July
      • Under the Sea ~ Paper Plate Crafts
      • Dream BIG with 'The BFG' these School Holidays
      • Be Inspired ~ Get Creative!
      • My Thoughts On The Gro-Clock Sleep Trainer
      • 6 Months With My Baby Girl
    • ► June
      • 5 Delicious & Nutritious Toddler (Approved) Lunch Ideas
      • Raspberry & White Chocolate Shortbread
      • Keep Warm & Snuggly This Winter With Babu
    • ► May
      • Julia & Libby's Wholefood Kitchen
      • DIY Car Storage Jars
      • Gaining Confidence With The YMCA Swim School
      • From The Munch Cupboard ~ Munch Baby Feeding Tray
      • Chocolate Bark Bites
      • Mother's Day Gift Tags - FREE Printable
      • Rose Petal Sugar Scrub
    • ► April
      • REVIEW: Golden Month
      • From The Munch Cupboard ~ Healthy Kids Cookbook
      • Isabelle Anne ~ Your Birth Story
    • ► March
      • Making Time For Me
      • Pastel Bunny Canvas
      • Caramello Filled Easter Cupcakes
      • Life is an Adventure
    • ► February
      • DIY Woven No-Sew Pillow
      • Vanilla and Green Tea Oatmeal Face Scrub
      • Meal Planning for the Busy Mum with FREE Printable
      • Easy DIY Magnetic Scrabble Chalkboard
    • ► January
      • Quick & Easy DIY Letter Décor
      • Play Idea ~ Summer Snow
      • Top 5 Tips for Travelling with a Toddler
      • Welcome Isabelle Anne
  • ► 2015
    • ► December
      • Mini Chocolate Christmas Puddings
      • Time for a Break
      • From the Munch Cupboard ~ Munch Eco Hero Baby Cup
    • ► November
      • REVIEW: Organic Care Package from Tigs & Boo
      • From the Munch Cupboard ~ Natural Wooden Baby Teething Necklace
      • REVIEW: Keeping My Kitchen Clean With Dettol
      • REVIEW: Eardrop's Journey: Sounds of the City
      • REVIEW: Comfort Food by Simon & Alison Holst
      • REVIEW: The Rabbit Who Wants to Fall Asleep
      • Children's Artwork Display
      • Pink or Blue? Old Wives' Tale Gender Predictions
      • Grown Ups Go Free with Kellogg's
      • 4 in 1 Nursing Pillow
      • Up-Cycled Wooden Crates
      • Thomas Themed Birthday Cake
      • A Simple Butter Cake
      • Chocoholic Choccie Cake
    • ► October
      • Lil Gooseberry ~ 32 Week Update
      • SNUGPOD - the perfect swaddle every time!
      • DIY Pillowcase Wall Art
      • REVIEW: Educational Colours Art and Craft Range
      • Toddler Fun ~ Threading
      • REVIEW: Finish Quantum Max
      • Transport Inspired Boys Bedroom
      • REVIEW: Funky Giraffe Bandana Bibs
      • Sebastian's 2nd Birthday ~ A Thomas Party
      • Lil Gooseberry ~ 28 Week Update
    • ► September
      • Two Years With My Little Man
      • A Serious Case Of Baby Brain
      • Hacked! Shadow Box Houses
      • REVIEW: Pineapple Heads Bath Time Products
      • Red Velvet Cake With Cream Cheese Icing
      • Creating Smiles With Allen's
      • Lil Gooseberry ~ 24 Week Update
      • Lil Gooseberry ~ 20 Week Update
      • DIY Sharpie 'Scribble' Mugs
    • ► August
      • This Is Me ~ The Face Behind Always Made With Love
      • Pushing Pause
      • Super Fun & Easy DIY Bubble Art
    • ► July
      • Ducks To Water
      • Decadent Cadbury Jaffa Slice
      • Jelly Tip Cheesecake Truffles
      • Key Lime Pie
      • Help! The Wolf is Coming!
      • Lil Gooseberry ~ 16 Week Update
    • ► June
      • Peppa Goes On Holiday
      • 21 Months of Cuteness
      • Coconut Loaf
      • Baby # 2 ~ The Details
      • Watties and Heinz Little Kids Range
      • Something A Little Bit Special...
    • ► May
      • Always Made With Love Turns ONE
    • ► April
      • 20 Facts
      • More Toys! Less Fun?
      • Buzzy Bee Books
      • Salami, Pesto & Mozzarella Muffins
    • ► March
      • 18 Months of Cuteness
      • Easter Bunny Treat Jars
      • DIY Baby / Toddler Swing
      • The Birthday Monster by Bridget Sherlock
      • Upside-down Plum Cake
    • ► February
      • 17 Months of Cuteness
      • Five Days Left By Julie Lawson Timmer
      • Sleep ~ Transitioning From Two Naps To One
      • Roasted Strawberries
      • Kiwi Mummy Blogs Review ~ Recipes For Messy Play
      • Birth Keepsake Wall Art
    • ► January
      • Roast Cherry Tomato & Spicy Chorizo Pasta
      • 16 Months Of Cuteness
      • Sebastian's Nursery
      • SHINE Blog Hop
      • My Goals ~ 2015
      • It's Official.. I'm Back
      • Hello 2015
  • ► 2014
    • ► December
      • Our Christmas ~ 2014
    • ► November
      • 14 Months Of Cuteness
      • My Favourite Chocolate Chip Cookies
      • Moroccan Lamb Burgers
      • ...And Schumi Makes Five
      • Piggy Pasta And More Food With Attitude
    • ► October
      • Bubba Bites - Muesli Teething Biscuits
      • Letter To My Little Mister
      • Sebastian's 1st Birthday Cake Smash
      • Bolognese Pinwheels
      • Lemon Coconut Slice
      • Kiwi Mummy Blog Review ~ Pic's Really Good Peanut Butter
    • ► September
      • Looking Back ~ The Early Days
      • Strawberry Ice Cream Tart
    • ► August
      • 11 Months Of Cuteness
      • Bubba Bites
      • Zzzz... Sleep
    • ► July
      • 10 Months of Cuteness
      • 9 Months of Cuteness
    • ► May
      • 8 Months of Cuteness

Copyright

I love it when you share. Please note all images and text on this site are property of Always Made With Love. You may use one or two photos, provided you link back to my original post. Please do not crop, edit or remove watermarks from any of my images, without obtaining permission from me first. Thank you!

Copyright © 2018 · Always Made With Love · Sprinkle theme by Restored 316

loading Cancel
Post was not sent - check your email addresses!
Email check failed, please try again
Sorry, your blog cannot share posts by email.