• HOME
  • ABOUT
    • PRIVACY
    • DISCLOSURE
    • TERMS & CONDITIONS
  • Get in Touch

Always Made With Love

  • DIY / Crafts
    • DIY
    • CRAFTS
    • CELEBRATE
      • EASTER
      • CHRISTMAS
      • PARTIES
  • Lifestyle
    • ACQUISITIONS
  • Motherhood
  • Kids
    • BABY
    • TODDLERS
    • KIDS CRAFTS / ACTIVITIES
  • Food

Children’s Artwork Display

November 20, 2015 by lydiaritchie 2 Comments

childrens-artwork-displayAs I am sure you are aware of by now, Sebastian and I love getting creative and most of our afternoons involve an invitation to play of some description. Fairly often that involves ‘messy play’. Recently, painting has become a firm favourite and most requested activity (ever since we got to review this fun box of goodies here). The thing with painting, well there are two things really.. one, they have to dry somewhere and two,  they take up so much space. So far so good, we have been lucky enough to have fine weather so they are able to dry on the outdoor table, if not at a pinch the kitchen bench (hopefully drying time isn’t dinner time); as for the space issue, lots of his paintings get filed away, some get given to lucky grandparents or used as birthday wrapping paper and the very special ones get displayed on the fridge until the next special one is created.

Using magnets and blue tack to hold Sebastian’s artwork on the fridge just wasn’t cutting it and they were forever falling down, or being given a helping hand (that’s toddlers for you) to the floor. So after many an afternoon hunting for fallen magnets and / or both trying to convince my little Picasso to leave his painting there, I decided a more robust option was needed.

childrens-artwork-displayWhen I originally had this idea I was looking for a large wooden car cut out which I was going to paint and decorate with his name, but as time went on I was unable to find what I was after. Eventually I came up with idea here and I love it. I love that it is adaptable to each child and can be changed as they grow without too much difficulty. Plus, I am able to create another one using the same basic concept when number two is ready for one and personalise it to suit them.

This is a fairly easy DIY and definitely one you will be able to adapt to your own liking.

childrens-artwork-displayTo make your own Artwork Display, you will need:

  • A photo frame; I chose to go with an A4 sized one as it fits well on my fridge
  • A piece of cork, found at your local craft store (you could also use scrapbooking paper); I just like the cork look and found some real cheap
  • Letters, these can be plastic or wooden, (size dependant on your frame)
  • Embellishment’s of choice; I found these cute foam vehicles to use
  • Pegs, wooden or plastic (size of choice)
  • Sand paper (fine grit)
  • Spray paint, colour / colours of choice
  • PVA or craft glue
  • Hot Glue Gun

Start by remove the glass and backing from your photo frame. If you have a use for the glass, good on you (I haven’t come up with one yet); if not wrap it up and discard appropriately. Lightly sand your frame, and wipe down with a soft cloth.

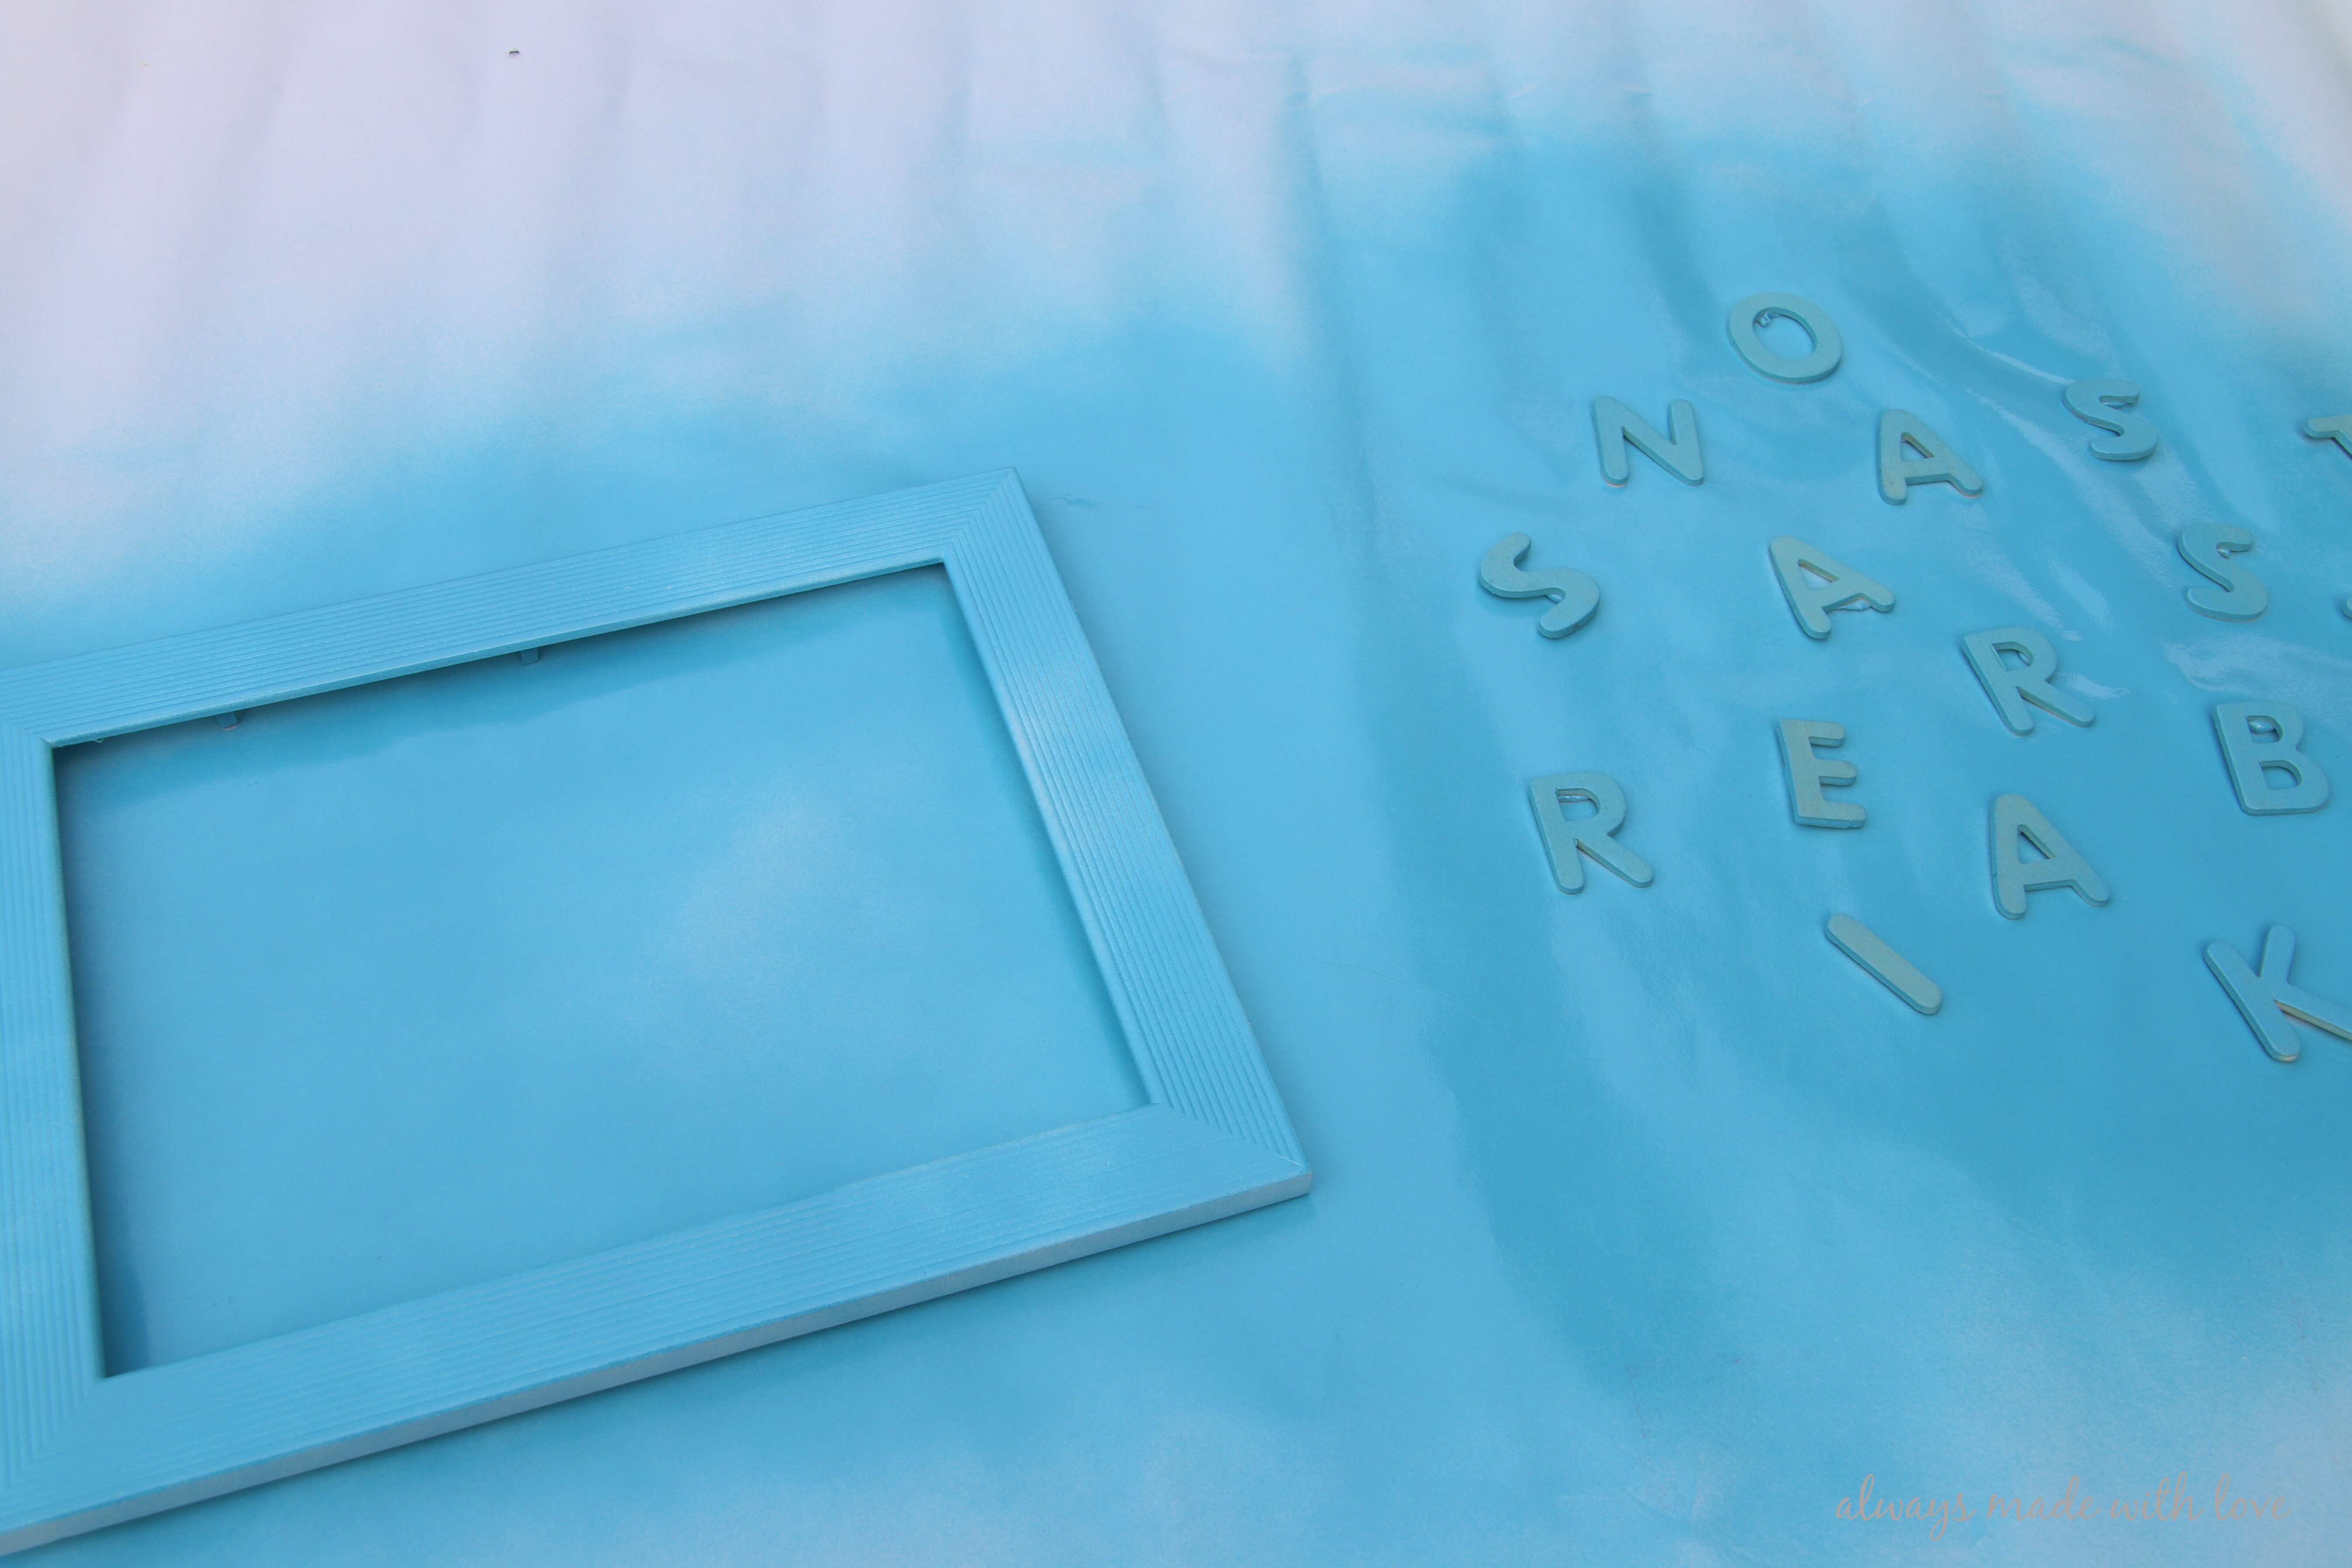
Next, take your sanded frame and letters; in a well ventilated area (I went outside), lay down sheets of newspaper or a drop cloth to protect the surface you are using (even though I put down paper, our drive has a bit of a blue tinge to it, oops! 😉 ). Following the directions on the spray can, evenly apply a couple of light coats of paint, ensuring the you cover all surfaces. I probably applied four coats all up, three main coats and an additional touch up one in the patches I missed. Leave to completely dry. 

childrens-artwork-displayCut your cork to size, using the backing from your frame as a guide. Attach the cork to the backing using your preferred choice of glue, I used good old PVA.

Once frame is dry, reinsert backing. Now is the time to get creative and have fun.. decorate with embellishments; playing around with the positioning of your letters, once happy glue down. As you can see I had to get a little bit creative with ‘Sebastian’s’ name as it was a bit big to do straight across (due to the space I had on my fridge I couldn’t use a frame that was any bigger). This will all be dependant on the size of your frame, length of name you are doing and also the size of the letters you manage to source.

childrens-artwork-displayFinally, I added some wooden pegs to the bottom of the frame, I found hot glue worked best here as it is a bit harder for small fingers help with the removal process 😉 I used four medium sized pegs, this allows for multiple pieces of artwork to be displayed and also helps hold those bigger, thicker pieces of part.

There you have it – a simple, easy and effective way to display your Children’s Award Winning pieces of artwork!

childrens-artwork-display

What do you do with your child’s artwork? Do you display it in some way or file it away? 

signature

  • Twitter
  • Facebook
  • Google
  • Pinterest
  • More
  • Reddit
  • Email
  • Print

Related

«
»

Filed Under: DIY, DIY / Crafts Tagged With: Create, DIY, DIY & Crafts, Kids, Kids Artwork

Comments

  1. Charlene says

    November 21, 2015 at 8:18 am

    What a great idea, Lydia! Love that it’s personalised for Sebastian ! Such a clever Mama you are.

    Reply
    • lydiaritchie says

      November 23, 2015 at 2:19 pm

      Thanks Charlene, always fun putting things together for my little man 🙂 xx

      Reply

Leave a Reply to lydiaritchie Cancel reply

Your email address will not be published. Required fields are marked *

Welcome! I'm Lydia, the face behind Always Made With Love; wifey to Steve and stay at home mummy to Sebastian and Isabelle. I blog about motherhood, my family, our life, food I love, as well as crafts and the odd DIY. Join me and stay a while xx
  • Email

LATEST ON INSTAGRAM

Saturday, February 3rd, 2018 at 7:28pm
  • 47
  • 1
Saturday, February 3rd, 2018 at 5:15pm
  • 52
  • 4
Saturday, February 3rd, 2018 at 11:59am
  • 46
  • 1
Friday, February 2nd, 2018 at 7:55pm
  • 49
  • 3

Sponsors

Isabella Bows

Archives

  • ► 2017
    • ► December
      • From the Munch Cupboard ~ Munch Eco Straws
    • ► October
      • Introducing: Optically.co.nz
    • ► September
      • Toddler Tuesday's at NorthWest
    • ► August
      • Shop Small, Support Local featuring Fox & Child
      • Mid Winter Mexican
    • ► July
      • Shop Small, Support Local featuring Children of the Trees
      • Shop Small, Support Local featuring KP Designs
    • ► June
      • Shop Small, Support Local featuring Owl & Monkey
      • Chux - Helping this Mum clean since 2013
      • Shop Small, Support Local featuring Mud Mates
    • ► May
      • Shop Small, Support Local featuring Only Love
    • ► April
      • Shop Small, Support Local featuring Isabella Bows
      • Relax! I'm Cosy. {Review & Giveaway}
      • Yoghurt Pops
    • ► March
      • Shop Small, Support Local featuring Dream Ruby Boutique
      • Shop Small, Support Local featuring Daisydot
      • Letter to My Little Miss
      • Shop Small, Support Local featuring Silverstone Jewellery
      • Ditching Plastic with Honeywrap
    • ► February
      • SoSimple Skincare Review
      • Summer at the Beach With Kids
    • ► January
      • Summer Berry Semifreddo
      • New Year! New Direction?
  • ► 2016
    • ► December
      • Chocolate Brownie in a Jar with FREE Printable
      • Gingerbread Reindeer Cookies
      • A Giveaway & A Coffee Machine
    • ► November
      • How To Make An Anti Gravity Cake
      • 'Boody' Organic Bamboo Eco Wear || Anything BUT Basic
      • Banana Chocolate Chip Muffins
    • ► October
      • Revitalash Eyelash Conditioner
      • Preparing for Preschool
      • From the Munch Cupboard ~ Munch Lunchbox
      • Who's on Pole? ~ Book Review
      • Preschool
      • Relax with Float Culture
    • ► September
      • Double Chocolate Ice Cream Sandwiches
      • 3 Years With My Little Man
      • Create a Treasure Chest
      • Tot's Pantry ~ Nutritious Meals for Little Tummies
      • Isabelle's Girly Nursery Reveal
      • From the Munch Cupboard ~ Munch Baby Feeder
    • ► August
      • Sachie's Kitchen Meal Kits
      • Honesty. Honestly.
      • I'm Breaking Up With SNAPCHAT
      • Cheese Puffs
      • Go Fish! DIY Fishing Game
      • Having Fun Outdoors this Winter
    • ► July
      • Under the Sea ~ Paper Plate Crafts
      • Dream BIG with 'The BFG' these School Holidays
      • Be Inspired ~ Get Creative!
      • My Thoughts On The Gro-Clock Sleep Trainer
      • 6 Months With My Baby Girl
    • ► June
      • 5 Delicious & Nutritious Toddler (Approved) Lunch Ideas
      • Raspberry & White Chocolate Shortbread
      • Keep Warm & Snuggly This Winter With Babu
    • ► May
      • Julia & Libby's Wholefood Kitchen
      • DIY Car Storage Jars
      • Gaining Confidence With The YMCA Swim School
      • From The Munch Cupboard ~ Munch Baby Feeding Tray
      • Chocolate Bark Bites
      • Mother's Day Gift Tags - FREE Printable
      • Rose Petal Sugar Scrub
    • ► April
      • REVIEW: Golden Month
      • From The Munch Cupboard ~ Healthy Kids Cookbook
      • Isabelle Anne ~ Your Birth Story
    • ► March
      • Making Time For Me
      • Pastel Bunny Canvas
      • Caramello Filled Easter Cupcakes
      • Life is an Adventure
    • ► February
      • DIY Woven No-Sew Pillow
      • Vanilla and Green Tea Oatmeal Face Scrub
      • Meal Planning for the Busy Mum with FREE Printable
      • Easy DIY Magnetic Scrabble Chalkboard
    • ► January
      • Quick & Easy DIY Letter Décor
      • Play Idea ~ Summer Snow
      • Top 5 Tips for Travelling with a Toddler
      • Welcome Isabelle Anne
  • ► 2015
    • ► December
      • Mini Chocolate Christmas Puddings
      • Time for a Break
      • From the Munch Cupboard ~ Munch Eco Hero Baby Cup
    • ► November
      • REVIEW: Organic Care Package from Tigs & Boo
      • From the Munch Cupboard ~ Natural Wooden Baby Teething Necklace
      • REVIEW: Keeping My Kitchen Clean With Dettol
      • REVIEW: Eardrop's Journey: Sounds of the City
      • REVIEW: Comfort Food by Simon & Alison Holst
      • REVIEW: The Rabbit Who Wants to Fall Asleep
      • Children's Artwork Display
      • Pink or Blue? Old Wives' Tale Gender Predictions
      • Grown Ups Go Free with Kellogg's
      • 4 in 1 Nursing Pillow
      • Up-Cycled Wooden Crates
      • Thomas Themed Birthday Cake
      • A Simple Butter Cake
      • Chocoholic Choccie Cake
    • ► October
      • Lil Gooseberry ~ 32 Week Update
      • SNUGPOD - the perfect swaddle every time!
      • DIY Pillowcase Wall Art
      • REVIEW: Educational Colours Art and Craft Range
      • Toddler Fun ~ Threading
      • REVIEW: Finish Quantum Max
      • Transport Inspired Boys Bedroom
      • REVIEW: Funky Giraffe Bandana Bibs
      • Sebastian's 2nd Birthday ~ A Thomas Party
      • Lil Gooseberry ~ 28 Week Update
    • ► September
      • Two Years With My Little Man
      • A Serious Case Of Baby Brain
      • Hacked! Shadow Box Houses
      • REVIEW: Pineapple Heads Bath Time Products
      • Red Velvet Cake With Cream Cheese Icing
      • Creating Smiles With Allen's
      • Lil Gooseberry ~ 24 Week Update
      • Lil Gooseberry ~ 20 Week Update
      • DIY Sharpie 'Scribble' Mugs
    • ► August
      • This Is Me ~ The Face Behind Always Made With Love
      • Pushing Pause
      • Super Fun & Easy DIY Bubble Art
    • ► July
      • Ducks To Water
      • Decadent Cadbury Jaffa Slice
      • Jelly Tip Cheesecake Truffles
      • Key Lime Pie
      • Help! The Wolf is Coming!
      • Lil Gooseberry ~ 16 Week Update
    • ► June
      • Peppa Goes On Holiday
      • 21 Months of Cuteness
      • Coconut Loaf
      • Baby # 2 ~ The Details
      • Watties and Heinz Little Kids Range
      • Something A Little Bit Special...
    • ► May
      • Always Made With Love Turns ONE
    • ► April
      • 20 Facts
      • More Toys! Less Fun?
      • Buzzy Bee Books
      • Salami, Pesto & Mozzarella Muffins
    • ► March
      • 18 Months of Cuteness
      • Easter Bunny Treat Jars
      • DIY Baby / Toddler Swing
      • The Birthday Monster by Bridget Sherlock
      • Upside-down Plum Cake
    • ► February
      • 17 Months of Cuteness
      • Five Days Left By Julie Lawson Timmer
      • Sleep ~ Transitioning From Two Naps To One
      • Roasted Strawberries
      • Kiwi Mummy Blogs Review ~ Recipes For Messy Play
      • Birth Keepsake Wall Art
    • ► January
      • Roast Cherry Tomato & Spicy Chorizo Pasta
      • 16 Months Of Cuteness
      • Sebastian's Nursery
      • SHINE Blog Hop
      • My Goals ~ 2015
      • It's Official.. I'm Back
      • Hello 2015
  • ► 2014
    • ► December
      • Our Christmas ~ 2014
    • ► November
      • 14 Months Of Cuteness
      • My Favourite Chocolate Chip Cookies
      • Moroccan Lamb Burgers
      • ...And Schumi Makes Five
      • Piggy Pasta And More Food With Attitude
    • ► October
      • Bubba Bites - Muesli Teething Biscuits
      • Letter To My Little Mister
      • Sebastian's 1st Birthday Cake Smash
      • Bolognese Pinwheels
      • Lemon Coconut Slice
      • Kiwi Mummy Blog Review ~ Pic's Really Good Peanut Butter
    • ► September
      • Looking Back ~ The Early Days
      • Strawberry Ice Cream Tart
    • ► August
      • 11 Months Of Cuteness
      • Bubba Bites
      • Zzzz... Sleep
    • ► July
      • 10 Months of Cuteness
      • 9 Months of Cuteness
    • ► May
      • 8 Months of Cuteness

Copyright

I love it when you share. Please note all images and text on this site are property of Always Made With Love. You may use one or two photos, provided you link back to my original post. Please do not crop, edit or remove watermarks from any of my images, without obtaining permission from me first. Thank you!

Copyright © 2018 · Always Made With Love · Sprinkle theme by Restored 316

loading Cancel
Post was not sent - check your email addresses!
Email check failed, please try again
Sorry, your blog cannot share posts by email.